Tuesday, June 30, 2015

HIKING MOUNT COLVIN

Mount Colvin is the 40th peak in the ADK high peaks. Its part of the Colvin Range and stands at 4057 ft above sea level.

We have been focusing our hiking attention to Keene Valley over the past few years because we found relatively inexpensive losing at Ausable Inn and it's very close location to several different peaks that we haven't hiked yet. After this most recent hiking trip I realized that there is only one more left, Sawteeth.

As we get older and our families become larger with kids, at times its more challenging in finding a sitter for the kids for more than one day at a time. Also this time we had a weather factor that cut our trip a bit shorter. But nevertheless we still decided to go hiking even if its for one long day.

We were also very excited to introduce our friends, Ruslan and Vika to the ADK's. It was a mutual agreement that it would be better to start early, hike, and come home later that night. So we left Syracuse at 4 am made it into St. Huberts at 7:30 am. After some Ninxia/Nitro shots and photos we made it to the sign in at 8 am sharp.


On the Lake Rd the same thoughts always reoccur, "why can't there be a shuttle service to cut this unnecessary 6-8 miles out of the hike?" We made it to the Gillbrook Cutoff trail by 9:08 am. From there it was a gradual elevation increase for 0.5 miles.
 
 9:25 am

9:28 am

9:49 am
Lesya, my wife, was leading the group. She always sets a good pace. In fact it was so good that there were several hikers that liked our pace so much that they hiked with us for about a mile until they needed to stop and take a smoke break. The 0.7 miles from the above intersection had some steeper sections but nothing impressive. 

10:34 am

Once we hit the 1.1 mile marker before the summit, things heated up really quick. There were at least half a dozen large rock boulders that require some creative stepping but it was fun and challenging.  


11:31 am
At about 15 minutes before the summit the trail become really steep and challenging and therefor called for several breaks and photo's. 


We reached the summit at 11:42 am to some amazing views. The Great Range always have a glorious appearance so being able to appreciate the magnitude of the these peaks once again is always spectacular. 
These are the moments when its so awesome to soak in God's creation, that testifies of its Maker. Its funny how quickly one forgets the difficulty of the trail just walked when the eyes meet such a view.


Blake from Colvin
Fish Hawk Cliffs & Indian Head from Colvin

Slides on Basin

Sawteeth cliffs


At the summit there is an official marker indicating the elevation and name of the peak. Shortly thereafter we all sat down and had a nice lunch with great views. Lesya and I have never packed a sandwich during our past hiking trips. So this time we decided to give it a try and a PB & J worked out really well.


After a few summit photos we decided to keep going to Blake mountain. 

Mount Blake post to follow soon.

Fish Hawk Cliffs & Indian Head post to follow soon. 


Sunday, June 28, 2015

DIY MEDIA TABLE

An opportunity presented itself when we couldn't find a media table that was a particular size for our home theater. We already had a support beam trimmed with pallet wood and so I decided to build my own table from scrap pallet wood. I have never built anything out of wood up to this point. However, with plenty of available wooden pallets I decided to try it.


First came the pen and paper, and several sketches later I realized that with that many options it would be very difficult for a rookie to choose the right one. So I decided to consult my carpenter/construction expert friend, Andrey T. 

With plenty of advice and good tips under my belt, the difficult part was finding the time to get this project going. Initially I was going to start building at the start of the year but with the heavy snows and bitter colds of the last winter really hampered the desire to get out. So I waited until the warmer weather. With other projects in the works with warm weather, getting the table done quickly became more challenging. 

Shortly after I brought the pallets I used a sawzall to cut them up a lot quicker then if I pulled the nails out individually.

I also bought a table saw and a miter saw in order to get this project done. It was like Christmas.

The second step I ripped 100" beams that were used for the frame. I had to use a more heavy duty saw that could cut through nails. The Diablo 84 teeth blade worked really well. The 4" beams were cut in half. 

The 6 legs I kept at 4" wide. In order to fit nicely beneath the screen the table had to be 17" tall.


The dusty part of the project came when I used the router to make a groove for the shelves. It was a 4 hour ordeal that ended with sore wrists and forearms. Thanks again to my friends who trusted me and let me borrow this expensive piece of equipment.


It was nice to work in one of my garages because the dust and shavings were extensive. It was fun dusting everything off and then sweeping and vacuuming. But the outcome was awesome and worth 
all the pain.

One of the other things that I didn't know even existed before this project was the jig set. The set came with screws and wooden screw plugs. I had to buy more screws and ended up not using the plugs because they didn't fit well. At the end of the day it was a great tool but it required drilling 56 screw holes.  


The next step of glueing and screwing together all of the pieces made me a bit anxious because the wood that I used was not perfectly straight and therefore the alignment was somewhat tricky. But it turned out to straighter and more level than anticipated. Half of the table bowed inwards and was narrower by almost an inch compared to the other side so I placed an additional cross beam to push the middle out more. It worked out well and made for a uniform width across the full length. 


My favorite part of the this project was choosing the wood for the shelves and making to it look how I imaged it. I wanted to preserve the rustic look and therefore used parts of the wood that had the nail holes. It actually looked better to remove the nail heads out of the wood. The laying out and cutting took a good 8 hours but very rewarding. 


To secure the shelves in place I used wood glue and finishing nails on both ends. It was quick and easy and I really enjoyed using the nail again.


The next step was sanding which was a bit dusty but a lot less dustier then the router one. I used 150 paper for the first sanding then finished it off with 220. It turned out to be very smooth and it would later prevent any splinters for other family members.


During the pre-staining and staining process it was actually really cool to see the wood grain begin to stand out more. I noticed that the frame wood was a bit darker than the shelves and though it wasn't intentional I really like that look.

I pre-stained and then allowed for it to dry for 2 hours and then stained it with a natural color. I picked up a good tip from a wood pallet wood worker who recommended using a spray bottle to apply the stain. It worked out really well. It is always good to cover the floor to catch all of extra spray.


My friend also gave me a great tip that there is a clear matte finish that would help protect the table and preserve it's natural look. I couldn't find the polyurethane by Minwax but it was nice to find out that Rust-Oleum made a water based one. 

I applied it with a brush and used a sponge brush to even it out. The instructions stated that up to 2 coats could be applied for better coverage and protection and therefore I did that. It worked out really well. 

This is the final look as it stands in our theater room. It fit well and will always remind me of the process. It would have been fun to have a furniture branding took to put an official label on it and the date it was completed. 


Saturday, June 6, 2015

SMOKEY BONES COPYCAT BROWN SUGAR BABY BACK RIBS


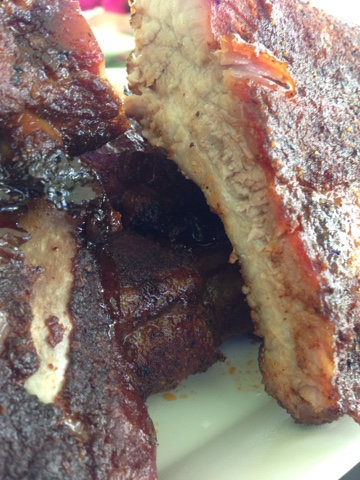
My previous post on smoking ribs has been strictly by the Myron Mixon recipe and cooking process. Most recently I decided to try something different and it turned out to be a mix of recipes and cooking processes so it partially my creation. They turned out to be really delicious and almost identical to the original Smokey Bones taste.

RIBS:
Baby back 5-8 lbs total weight (2-4 slabs)
Thin membrane on the back removed. Use paper towel to grasp and peel off.
De-fat as much as possible but don't remove all fat.


DRY RUB: (5 lbs of ribs) (Increase accordingly)
2    Tbsp Kosher salt
3/4 cups raw sugar
1    Tbsp black pepper
1    Tbsp onion powder
1    Tbsp garlic powder
1.5 Tbsp smoked paprika
4    Tbsp chili powder
1    Tbsp light brown sugar

Set aside 2 Tbsp of rub to use in the glaze.

Combine and mix together. Rub both sides of the ribs in a foil pan and refrigerate for 4 hrs.

Allow the ribs to stand at room temperature for 30-60 min. prior to cooking.

Prepare the glaze and spritz meanwhile.

Glaze:
2.5    cups light brown sugar
1/2    cup light corn syrup
1/3    cup white vinegar
2       Tbsp dry rub

Mix into a medium sauce pan and bring to a boil with medium heat. Keep warm or gently reheat prior to application.

Myron Mixon Spritz:
3/4     cup apple juice
1/2     cup white vinegar
1/2     cup liquid imitation butter (I Can't Believe Its Not Butter)

Mix ingredients into a spray bottle and spray slabs every 30 minutes for 2 hrs.

Smoker:
Preheat to 250 degrees Fahrenheit.
Place water basin and wood chips.
Recommended wood: Hickory, Apple or Peach
Maintain temperature 225-250 degrees Fahrenheit

After smoking/cooking for 3 hrs transfer ribs into a clean foil pan or drain oily/fat run off and use the same pan.
Pour non-refrigerated apple juice into the pan to just cover the bones.
Cover pan with foil and set back into the smoker for 1 hr.

Drain the apple juice.
Apply reheated or warm glaze generously on both sides of the ribs.
Turn off smoker.
Set pan back into the smoker for 30 minutes as the temperature decreases.
Remove from the smoker. Serve immediately and ENJOY!