Sunday, July 30, 2017

SMOKING PORGY (SHAD) FISH!


A few weeks ago I went fishing on the Blackhawk II charter boat of the coast of Massachusetts and maxed out on Porgy fish. After sharing some with family and frying it the good old fashion way, I decided to try something different. Smoking fish has been on my "must do" list for awhile, so with a few extra fish in my deep freezer it was a good opportunity. 

When googling the subject, I didn't find an endless list of things to do with porgy fish like I expected. Smoking porgy had even less hits. However I was able to do enough research to compile a brine recipe and get a better idea of how to smoke fish. 

A recommendation from one source using a brine to properly clean the fish from the blood, slime, etc. I like the idea and it turned out well. 

The fish can be prepared in several different ways. The easiest way is have it gutted and head removed, with scales on. My fish was gutted, scales and head removed. I also wanted to try just fillets for variety's sake. 

BRINE 1
8 cups water 
1 cup Kosher salt

BRINE 2
8 cups water
1/3 cup of Kosher salt
1/2 cup dark maple syrup
1 chopped medium onion
3 minced garlic cloves
2 tbsp lemon juice
1 tbsp black pepper
1 tsp chili powder
4 bay leaves
1 tsp coriander seeds

Bring the contents of both brine to a simmer and turn off the heat. Both brine need to be cooled prior to using, so I prepared the brine in the evening and allowed both of them to cool to room temperature over night. I also took the fish out of the freezer and allowed it to defrost until brining time the next day.

The nice thing about brining fish is that it doesn't take very long. In this case, longer is not better, but some larger fillets may need longer brining time. In this case, brine the fish in the first brine for 30 minutes. Remove from the brine, gently rinse the fish with cold water and place in the next brine. To make the brining process easier, I used freezer ziplock bags for both brines. Doubling them up is a good idea when fish still have the spines that can puncture the bags. Brine the second time for 1-2 hrs. 


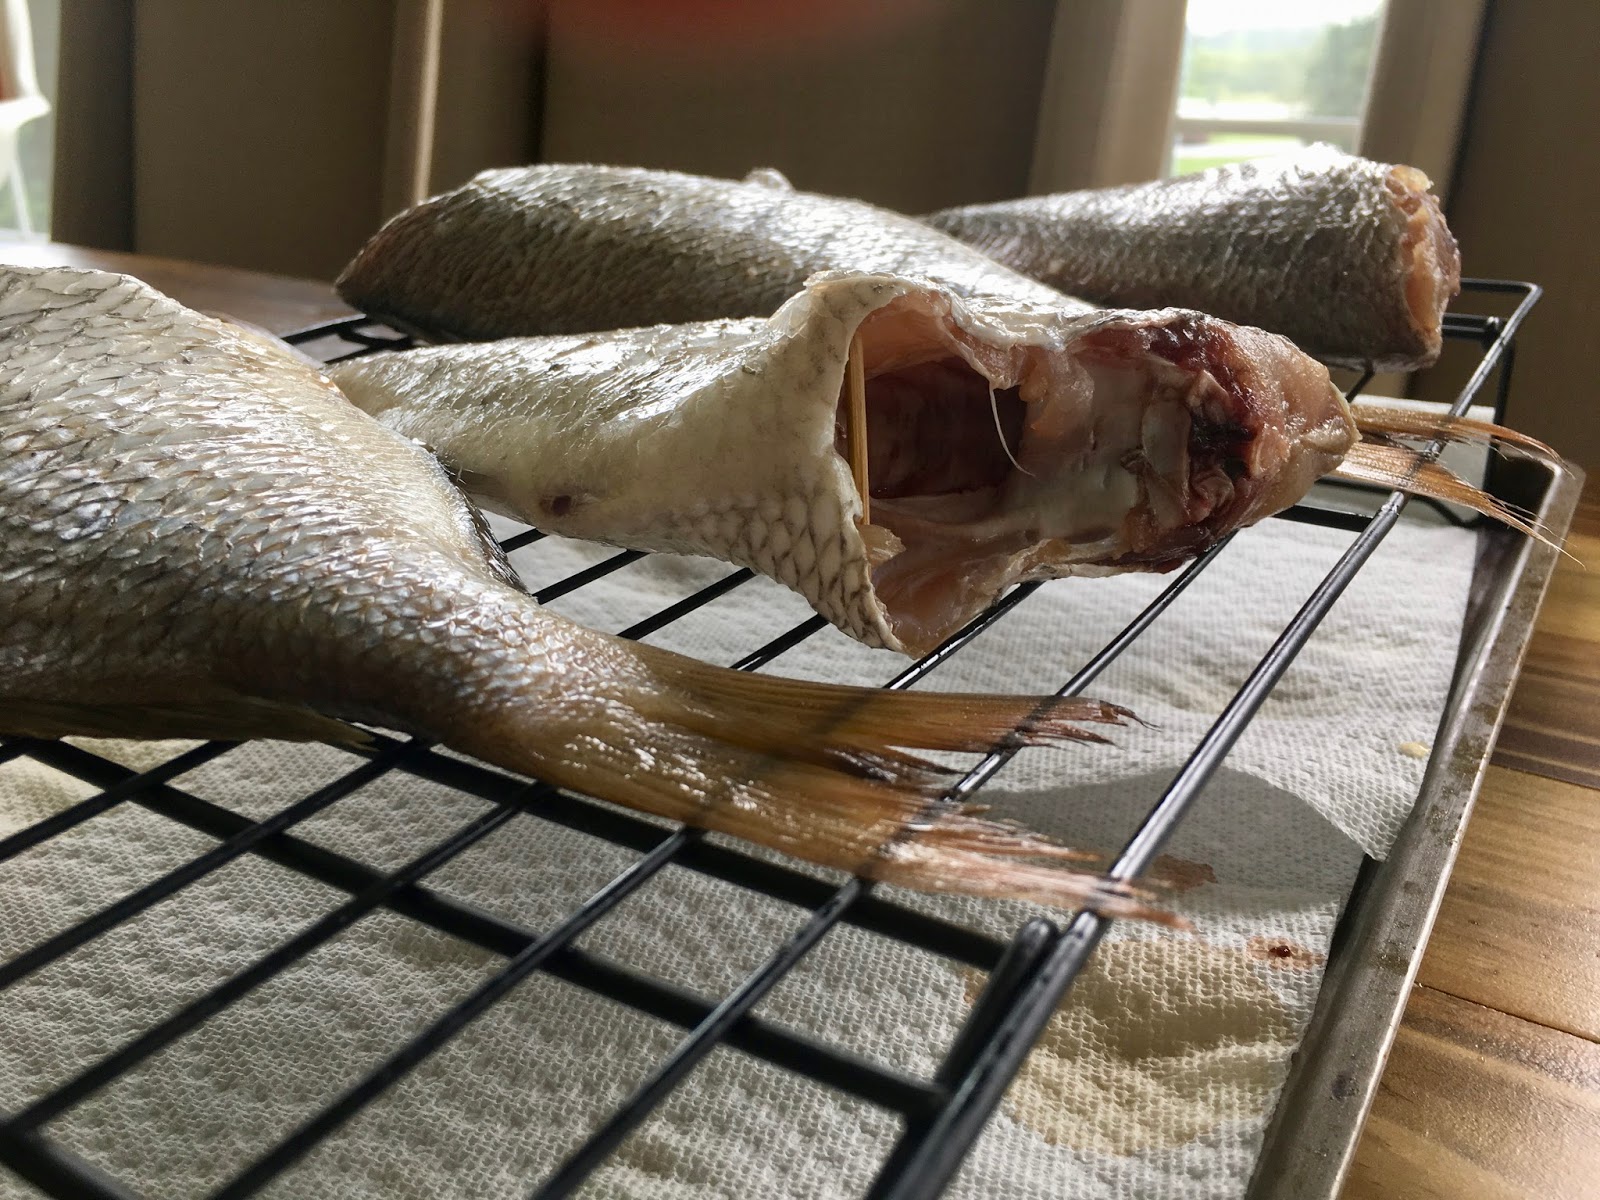
Remove from the brine, it on some drying racks and pat dry with a paper towel. It takes about 2 hrs in a low humidity room for the fish to form a pellicle. The drying process could be lightly expedited by using a fan. The whole house may have a lovely smell of brined fish but it goes away when quickly once removed.


Meanwhile, take this time to get the smoker and wood chips ready. This was my first time using
alder wood. The smell was amazing and the best choice for any type of fish. The alternative if you don't have alder is mesquite and apple. It's important to not over do the mesquite because it will have a bitter taste. Soak the woods chips for one hour. 

With my smoker I know it takes about 45 minutes to warm up to at least 300 degrees and then the wood chips begin to smoke. Twenty minutes later I can place the food into some nice quality blue smoke.


When examining the drying fish, the skin will feel drier and and even sticky in spots. A sufficient drying time is necessary because the smoke will adhere to this layer on the fish.


Once in the smoker make sure the fillets and thinner fish are on the take rack, further from the heat source. This time all 4 racks weren't needed so I removed them. Less cleaning to worry about later. 


Smoking temperature is critical to the outcome of a well smoked fish. Too hot and the fish might as well have been done in the oven. One way of knowing that the heat was to high is the oozing of a white sticky fluid which is the breakdown of the proteins holding the muscle fibers together. 

Cold smoke can be done with the proper equipment, maintaining the temperature around 90 degrees for 6-8 hrs. I used hot smoke which is defined as maintaining temperatures between 150-175 degrees F for 2 hours. Then turning up the heat to 200 degrees and maintaining it until the internal temp is 160 degrees. 

Unless it's freezing outside, it's difficult to maintain a really low temp on a propane smoker. To reach the ideal cooking temperature I had to keep the door open about 1/2 inch and keep one burner on at the lowest setting. It worked well with just a little more frequent checking. 


At about 2.5 hours I placed my barbecue Redi-Chek thermometer in the largest fish I had. I was at 140 degrees but with the heat turned up to 200 degrees the internal temp rose steadily. 


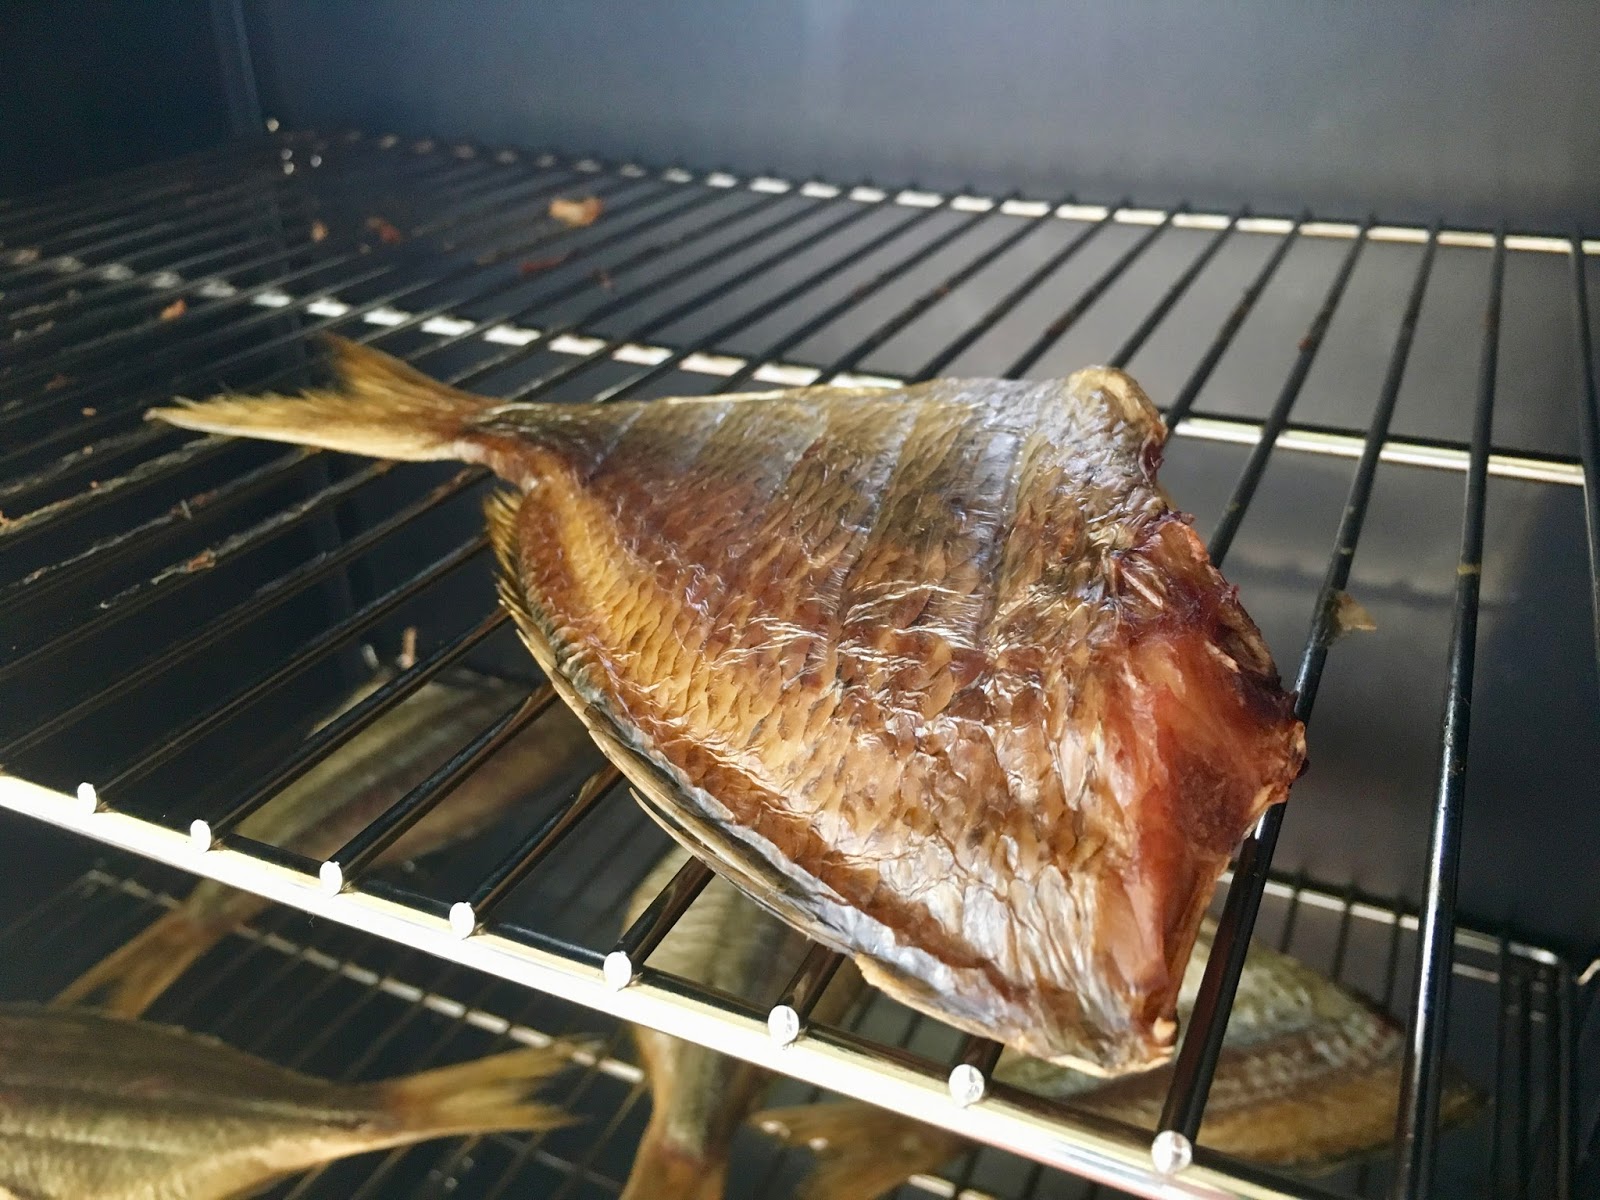
Once at 160 degrees internally, I reopened the door and because I had great smoke billowing out I decided to keep it going for another 30 minutes. After the smoke finished up, I like to just open the door of the smoker completely and allow the meat to gradually decrease in temperature before bringing it into the house. 


I have seen and tasted the quality of professionally smoked fish a great deal over the course of my life primarily because of my Ukrainian nationality. Although this fish wasn't professional quality yet it tasted really good. 


In particular, my kids and myself really enjoyed the fillets because of the stronger smokey flavor. 


For dinner that evening my wife prepared delicious baked potatoes which pared well with the smoked fish. 


Smoked fish can be enjoyed in many different ways. It can be sliced and placed on a cracker. I'm hoping to make a cracker spread as an appetizer while the fish lasts. 

For longer storage purposes, smoked fish should be refrigerated or frozen.  

Wednesday, July 26, 2017

YELLOW BEANS: FROM GARDEN TO JAR!

It was a couple years back that I was introduced to some canned dilly beans by a fellow colleague. Up to that point, I wasn't crazy about the green or the yellow bean. I ate them 2-3 times a year, usually boiled in water for a dinner meal. The factor that really caught my attention after sampling a canned green bean was the crispy texture and the slight hint of cayenne pepper in the marinade. It just worked really well together and I could see myself eating more of these. 

Last summer I visited the local regional farmers market and purchased 2-3 lbs of green beans and 1-2 lbs of left over scrawny looking yellow beans. I got the same recipe from my colleague and canned a few jars of both beans. After 3-4 months of hanging out in the pantry we gave it a try one fall evening for dinner. We noticed that the yellow beans were still crispy but a little softer then the green and we favored the yellow beans over the green beans. From that point on we knew we would be canning them again. 

With a new garden in place this year, we decided to plant a few bushes and see how well they grow. We planted everything in the garden at the end of May. And it seemed like most of the herbs, strawberries, radishes and sweet peas took off really fast but it took forever to see the beans come up. But once they got a few leaves, they took off. I also never appreciated how wide the bushes grow and begin to crowd other bushes. Next year it would be a good idea to plant the bushes a bit further apart. 


I was amazed to see how many beans grow on one bush. Total crop so far this year has been around 10 lbs of beans. 


It was just nice to know when prepping the beans that no pesticides nor herbicides were used on the plants. All the beans needed was a quick rinse with cold water. 


At this point I had several jars and lids washed, sterilized in the oven for 20 minutes at 200 degrees F, and ready to be filled. We had plenty of dill in the garden so I placed generous amounts of it in each jar along with a clove of garlic cut in half. 

INGREDIENTS
2 lbs green or yellow beans
1 tsp of cayenne pepper
4 cloves of garlic
4 heads of dill


The next tedious part of canning beans was cutting them to length so they would fit in the jar. Always use scissors because it's easier and faster. To start place the jar on its side and begin filling until all the beans are tight then place upright and finish filling the jar. 


The next step can be modified to your taste preferences. The recipe calls for 1 tsp of cayenne pepper divided among 4 pint jars. We definitely enjoy the cayenne pepper taste but in moderation. The same goes for the whole peppercorns. I placed 3-5 peppercorns in each jar. 


DILLY BEAN MARINADE
2.5 c water
2.5 c white vinegar
1/4 Kosher salt (1/4 c canning salt)

Combine the marinade ingredients into a pot and bring to a boil. This time I filled all of the jars first then made the marinade to see exactly how much marinade I will need. Once it boiled, begin filling each jar up to about 1/4 of an inch from the top. Place the lids on immediately after filling the jar to begin the sealing process. 

By this point I had prepared my water bath and it was gently boiling on the stove. After some recent reading I learned that the time that the jars need to boil varies based on the elevation above sea level. At 1,000 ft- 3,000 ft above sea level the boiling time is 5 minutes. 3-6,000 ft its 10 minutes. There is a chart available online for those interested in a visual. 


The beans already look so delicious when they come out of the water bath. Allow 24 hrs for the jars to sit at room temperature before you put them away in the pantry/cellar. I recommend not opening the first jar for at least 3 months, allowing the marinade to work through every part of the bean and solidify a great taste. 


Tuesday, July 25, 2017

SWEETEST PLACE: HERSHEY PARK, PA!

On our way back from Virginia we stopped at Hershey Park for 3 days. There is a lot to do and see in the area, so we decided to see a much as we could in a few days. It has to be noted that with 3 children under 7 years old, "as much as we could see" may not be that much to others. But it worked out well and for our first time we have the opportunity to see the major sites.

HERSHEY'S CHOCOLATE WORLD

After a quick lunch at the local Chipotle we went to explore the Chocolate World. We were lucky to get parking really close to the facility, although there is a shuttle/trolley service that runs all day to the parking lots further way. 

Admission is free.  


For a post-lunch dessert we got some delicious ice cream. My wife got the best one on the menu, a Kit Kat Lovers Sundae. 


Ariana's ice cream 'stache

With Ariana taking a little nap after her ice cream fill, the older two and I went to the Chocolate Tour which basically depicts the history of Hershey's founding and the making of chocolate. It's appealing to all ages with plenty of photos, paintings, and a moving tour at the end. 


At the store, which is literally the entire thing, we were able to get some toys for the kids, souvenirs for the grandparents, and of course chocolate for the sweet junkies. 

DINING IN HERSHEY

One of the things that I really like to do when we go on trips is to dine at a local restaurant. This generally takes some research and planning but it usually works well on every trip. I also always make sure I know where the safe chains are such as Chipotle, Five Guys, Dunkin Donuts, etc. just in case something doesn't work out. 

One evening for dinner we went to Smoked Bar & Grill, located just outside Hershey, an 8 minute drive from the park. Reservations are recommended especially later in the evening and on the weekends. We were glad that we did when the house was packed and we got seated without a wait. 


Our family really enjoys grilled and smoked foods so this met the criteria. The kids got the usual foods with a burger and mac & cheese. Lesya enjoyed her steak taco's and I decided to go on the limb and try there Glazed Donut burger.  


The Glazed Donut burger turned out to be ok. The donut itself was cooked a little too well and the bacon was hard as rock. At one point I removed the bacon to prevent broken teeth and sore jaw. The burger was cooked medium and tasted well. The factor that made this dining experience much better was the selection of barbecue sauces. I have made my own sauces a few times and when I sample these homemade sauces, I wanted to dip everything. 


Before we left, I asked our waiter if we could take a couple samples of a few of their sauces and I was surprised to see her bring a stack of to-go sauce containers. We filled them up with 3 of our favorites and later enjoyed them with our own grilled meats. 


A Chick-fil-a experience: prior to Hershey I have never eaten at this chain restaurant and when I found out it was located in the park, my wife and I looked forward to eating there. Yes its a fast food place and yes I can see how some people compare it to KFC, but its a lot better then KFC. After having lunch at the place, I liked it so much to go back there for dinner as well. 

HERSHEY PARK

At the opposite side of the park entrance, there is a hillside that welcomes you to the town of Hershey. 

One week prior to the trip, while looking for tickets online, I came across a great deal of Buy 2-Get One Free. We saved $50 on tickets for a family of 5. 

Immediately when driving into the parking lot, we got a hint of a Disney World feeling. In our mind Disney is #1 because the quality of the experience for adults and children is at its best in the entertainment world. We received a very nice welcome everywhere we went throughout the park. It was our first time and we asked for directions and recommendations throughout the day.

After we entered the park, we went to the measuring station and got wrist bands with the appropriate size for the rides. For the Hershey's and Reece's category there are 40 different activities for the kids.   


Milton Hershey Statue

Adrian has never been on any rides other than a Carousel at a local field days and so we had the opportunity the experience some interesting emotions as he was figuring things out. The Dino ride broke the ice and he actually enjoyed it by the end.


We also quickly learned that Adrian wasn't going on rides that had some height or speed. He become very observant prior to making a decision. So mommy and daddy took turns going with older sister Alexis on "older kid" rides. At the end it worked out well. 


After about an hour in the park, we decided to check out the water aspect of the park. As it turned out we spent the majority our time in the water section. The weather was partly cloudy and low 80's. The cooler pool and ride water was really refreshing. 


We took a break from the park for a couple hours and returned to the hotel room for some relaxing time. 

When we returned around 6 pm we had dinner and checked out the other sections of the park. We took a family train ride into the Wild West. 


For dessert we tried the Bubblez drink because it looked good. It turned out to be pretty good but very sweet. It can be best described as a sugar bomb with some soda-pop caffeine. The kids enjoyed it a little too much. 


HERSHEY'S ZOOAMERICA

All of our children enjoy the zoo and so it was a must on this trip. It was also included in our Park Admission fee, which was a bonus. Earlier in the day we asked a park employee the best way to get to the zoo. He explained that if we didn't go to the zoo from the park, there would be an additional zoo ticket expense. But if we followed the ZooAmerica signs it would lead us on a short cut. It was very easy to find. 


Once inside we followed the signs for the recommended route and it made sure to go to every area. We got there 40 minutes before closing and it was plenty of time to make it through the whole thing. We didn't have time to read every little sign and description but it was a nice enough pace for the kids to soak in everything that they saw. 


All of the animals at the zoo are native to this continent, especially the USA. Although there were no exotic animals, there was a lot of creativity in the zoo itself. When walking into the SWAMP section, the area smelled and felt like a swamp. In the DESERT section, the air was dry and strong smell of sand. 


At the bear exhibit there was a brown and black bear in the same section. They turned out to be quite entertaining with a lot of playing and running around. 


At the end we stopped by the gift shop to pick up some souvenirs. 


We even managed to take a nice family photo after a long day of walking around, playing in the water, enjoying the rides, and simply spending time together as a family. Its definitely a trip worth taking. We will have to return when the kids get a little older so that they can enjoy some more rides and activities in the park.